Screenshot of video tutorial for stringing lacrosse sticks.

The Essential Lacrosse Parents' Guide to Stringing Sticks

February 27, 2025
Kyle Devitte

The great parent debate: Learn to string or pay to string?

You’ll notice there is no third option. That’s because I am inferring that you know how important it is to have a properly strung head to play lacrosse.

Such an inference is clearly folly.

One of the things that doesn't transfer from other sports to lacrosse very well is the concept of the stick itself. It’s not just a one-size-fits-all thing or even one piece of gear to be assessed and sized for use.

A good stick is three pieces of gear — a shaft, a head and stringing — smushed together to create an oftentimes too customizable relationship with the player and the ball.

You’re forgiven for thinking otherwise. It’s important to know, though, that of those three parts, the most misunderstood is the stringing.

You’ve already paid $100 for the head and another $100-plus for the shaft. Why should you pay another $30-$60 for the stringing?

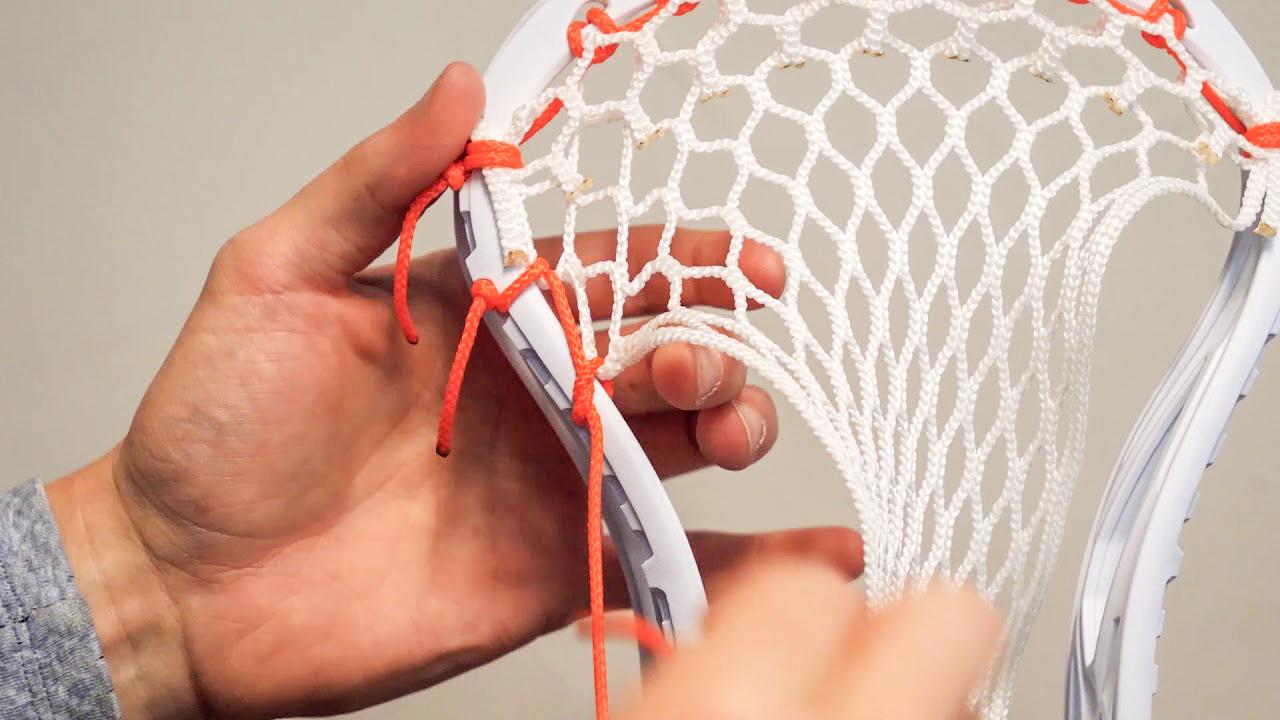
Because the pocket is the most important part of the stick.

Look, I’m a huge gear head. I’m into new and shiny things like an ADHD raccoon, but I know that there is a world of difference between a brand-new setup with a factory-strung pocket and a run-down backup with a perfectly broken-in pocket. The difference is that I know how to string, and you probably don’t.

But there is hope. Again, you have two options:

Option A: You can learn to string thanks to the magic of the internet followed by hours of practice.

Option B: Or you can choose a seasoned (re: professional) stringer to construct your son or daughter’s weapon of choice.

If you choose Option A, it’s going to be an extremely frustrating and arduous journey. That said, you will be rewarded with cool mom/dad status and you will save money in the short and long run.

If you have younger kids, Option A is a lot more palpable.

Disclaimer: This article includes affiliate links. USA Lacrosse earns a small commission on qualifying purchases. Any revenue we generate supports our mission to grow the game.

STRING IT YOURSELF

Congratulations, you chose Option A. You are a brave and fearless individual. So now let me tell you the secret to stringing.

You must learn how to do a basic functional pocket in four steps.

1. Top string

2. Sidewalls

3. Bottom

4. Shooting strings

(I’m sorry, girl dads and moms. Learning how to string a girls'/women’s pocket is so difficult and time-consuming and has so many rules that I can’t help you. Luckily, most of those sticks are pre-strung and need more breaking in than out-and-out replacement stringing. The cost is built into the women’s stick model now. You’re still brave for choosing Option A, though. I appreciate you reading this far.)

Hero 4.0 Semi-Soft Mesh

Mesh Options

ECD Hero 4.0 Semi-Soft Mesh (pictured)
$24.99 at Lacrosse Monkey 

StringKing Type 5X Performance Lacrosse Mesh
$29.99 at Lacrosse Monkey

Top String

The top string is the second-easiest thing to learn how to string behind the bottom string. That said, the learning curve is still a bit steeper than you might think. Modern lacrosse mesh has rows of diamonds that alternate between 9-10 diamonds. That means when you fold over the top part of the mesh (which is a key starting point), you can have 9-10 diamonds staring back at you like your kid when you tell them it’s time to put down the tablet.

I learned how to tie up a 10-diamond top string first because it is easier to process — something about the even number and the less-taught tension. I also learned how to string left to right on the back of the head, which is apparently not cool anymore.  

Here are two good tutorials to get you started.

Sidewalls

The sidewall is where a pocket is made and thus it is the most important part of the stringing process.

Like the top string, the number of diamonds you want to attach down the back rail is around 9-10. How they are attached and where those attachment points are will determine how, and if, your pocket functions.

The most integral part of the sidewall installation is that each side is identical. If you miss one diamond, you’re going to have a wildly imbalanced pocket, and that is no bueno. Some heads will punish you more than others, but it’s a universal rule that every connection point must be the same.

As a result, stringing the sidewall is the most difficult aspect to learn and takes, well, years to master. The good news is that you can learn how to string a sidewall with just two connection methods/techniques: a single interlock and a single over-under.

That might sound like gibberish now, but after you watch these videos, it will make more sense.

ECD HeroStrings Kit

Sidewall and Top Strings

ECD Lacrosse HeroStrings Kit
$11.99 at Lacrosse Monkey

Bottom

The bottom is the least important and easiest aspect of how to string a lacrosse head. I almost didn't put it on the list because I have only used two variations of the bottom string in every head I have ever strung.

And they’re from this video.

Shooting Strings

The cool kids will tell you that you don't even need shooting strings now because the sidewall patterns and mesh are so advanced that you can create all the tension and pockets that you need with the right set of knots.

Those people are faceoff guys, or they’re insane. Every stick should have at least one shooter — if only to have something to adjust down the line and keep/change the tension that you need at the top of the head.

I am a “weaved shooters only” sort of guy after a dalliance with rolled shooters back in 2014, because most players have only ever known weaved shooters and they’re much more simplistic to install. I use a guided, or threaded, method, but there are prettier ways to put the shooters in.

The first video here is my archaic method. The second one is for looks and utility.

Bottom strings and shooters

Bottom Strings and Shooters

StringKing Performance Strings
$4.99 at Lacrosse Monkey

StringKing Performance Shooters
$6.99 at Lacrosse Monkey

Some partly solicited advice on stringing an entire stick: just do one of the four parts each day. It will take a lot longer, but it will save your sanity.

Day 1: Start with the top string the first day and check to see if it is even at least five times.

Day 2: Really try to dial in the first three to four connection points on each side of the sidewall. They should be tight and the exact same on each side.

Day 3: It’s time to experiment with where you’re placing your pocket to fit the head. This is the most difficult step. You will repeat it probably 20 times for each head when you start. That’s OK. Take your time. When you have what looks like a decent pocket, install the bottom string. Throw a ball in there and toss it up in the air a few times. If it comes back and hits you in the face or doesn’t come out at all, it’s strung too tightly and/or has too much whip. If the ball flies out in front of you, you have strung a tennis racquet, and you need to start again.

Day 4: Once you have those problems solved, it’s time to install the shooters. Once those are in, you can have a few practice throws. I like to shoot the ball into my couch cushions, which everyone I have ever lived with hates, but it does give you a nice indicator of utility. Then you can bring the stick outside and have a catch.

Adjustments will still need to be made, but that’s normal. You’ve done all the work. Congratulations.

Option B

Option B is much easier to stomach effort-wise, but your wallet, which is probably strained as is because you’re a lacrosse parent, will be less compliant. If you have older kids, this is likely a fate you have already accepted. So I’m going to help you out.

Here are three of the best stringers that I know. Each one of them can assist you with any problem you have. They are master stick diagnosticians, doctors and surgeons all at the same time. (Yes, the Surgeon is a lacrosse head. You’re doing great.)

Lars Keil aka Sidewall Jedi

Lars is, in my mind and the minds of thousands of stringers, the authority on stringing truly elite pockets. He understands pocket and mesh dynamics like no one else in the space. As a result, he is often booked by top Division I teams as well as individual clients. However, even if you can’t cut to the front of his line to get your stick strung in a hurry, he’s always happy to answer questions on Instagram Live, DMs and in person at events like the New England Youth Lacrosse Convention.

David Swartz aka Smashtime Strings

A stringer turned coach, Swartz is still a huge part of the community after years of serving as “your favorite stringer’s favorite stringer.” He’s still offering his stringing services to everyone and offers a necessary commentary on the game itself. I’m recommending Swartz even though he and I disagree on a few aspects of the stringing genre because he stands strong in his principles and knows how to match pockets to players in a way that is uncanny.

Jeff Rurey aka STNY Strings

There is a thing that really separates Jeff from most stringers who have made their craft into a business, and that’s consistency. I have never seen a pocket from STNY Strings that I have not been like, “Oh. That’s nice. I bet that throws dimes.” Out of these three people, he straddles the median of being utilitarian and expedient, which are two qualities you always want out of your stringer.

Butane Lighters

Useful Tools

Refillable Butane Lighter, 2-Pack
$12.99 on Amazon

8" All-Purpose Scissors
$11.99 on Amazon